Front Ensemble Tool Box
|
|
Keyboard Types and Ranges
Xylophones
Rosewood bars sound the best on xylophones, yet synthetic bars are better for out door performances. WHS uses Kelon (synthetic bars) for their xylophones.
Use hard rubber or plastic mallets.
Rosewood bars sound the best on xylophones, yet synthetic bars are better for out door performances. WHS uses Kelon (synthetic bars) for their xylophones.
Use hard rubber or plastic mallets.
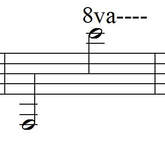
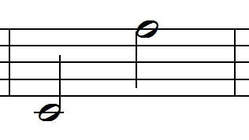
Range of a standard Xylophone (treble clef)
Sounds an octave above written pitch |
Image, standard Xylophone
|
Marimbas
Generally notated with a grand staff (both treble and bass clefs). WHS uses a 4.3 octave marimba, though 4.5 and 5 octave marimbas are popular in the collegiate arena. The bars of a marimba are thicker than the xylophone and is made of wood or synthetic material.
Use yarn, cord, or SOFT rubber mallets when playing the marimba. DO NOT USE PLASTIC MALLETS as they will dimple or crack the bars.
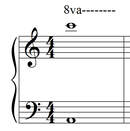
Range of a standard Marimba, 4.3 octaves
Sounds as written |
Image, standard Marimba
|
Glockenspiel (AKA Orchestra Bells or Bells)
A member of the metallophone family, the metal bars of the bells are usually made of tempered steel. "Real" bells are are in a wooden box with a removable top. Practice bells are more common in the lower grades coming in rolling backpacks etc. Practice bells are fantastic for practicing at home so make sure you have either bought or rented your own!
Use either hard rubber or plastic mallets. Brass mallets should only be used when written specifically in the music to create a really bright, brilliant sound. Too much use with brass mallets can eventually damage the bars. Change the type of mallet depending on the dynamic of the passage.
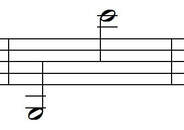
Range of a standard Glockenspiel (in treble clef)
|
Image, standard Glockenspiel
|
Vibraphones
The other member of the metallphone family, vibraphones are made of a metal alloy and are suspended over resonators using a petal to dampen or allow resonance on each pitch when the pedal is pressed downwards. Check out the pictures below to see the damper pedal and the pedal post that can adjust the height of the pedal.
Vibraphones also have the use of a motor which produces a vibrato effect when turned on. The motor usually has three speeds, but requires electricity.
If a bar produces a "dead" sound, check to see if the fan is perpendicular to the resonator as it could be dampening the bar unintentionally.
Use yarn or cord wound mallets on Vibraphones preferably with rattan shafts. DO NOT USE RUBBER OR PLASTIC.
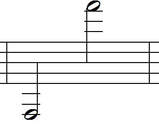
Range of standard Vibraphone (in treble clef)
Sounds as written Image, damper pedal
|
Image, standard Vibraphone
Image, height adjustable post that fastens to dampening mechanism
|
Crotales
Crotales are thick, brass plates between 2-5 inches in diameter. WHS do not currently own a set of Crotales, but if you have a lead on a used set, please let me know. Always put crotales back in their cases and be careful when transporting as they can be knocked out of tune pretty easily.
Use plastic, aluminum, and brass mallets on Crotales- the mallet used will depend on the desired sound; the harder the mallet, the brighter the tone.
|
Range of standard Crotales
Sound 2 octaves above written pitch Sold as separate octaves |
Image, mounted Crotales
|
Chimes (AKA Tubular Bells)
Like the Vibraphone, Chimes are also made of metal, though they are tubular in nature instead of flat bars. The pedal, usually located on the right side of the instrument, allows the chimes to resonate and hold pitch when depressed.
Chimes are played on the side of the tube cap, NOT on the tube itself. If you hit the tube itself could knock them out of tune or crack them. To get the best sound, strike the tube caps at a perpendicular angle;straight down or at an acute angle will bury the resonance quality of the tube itself.
Use the rawhide mallets to play on the chimes- if a piece instructs you to use any other type of mallet, confer with Ms. Mitchell to verify accuracy of part.
Range of standard Chimes (treble clef)
Sound as written |
Image, standard Chimes
|
Grips and Strokes
|
Two Mallet Grip:
|
- Thumbs should be on the side of the shaft
- Note the position of the mallet heads, as they are angled to one another, not next to one another
- Keep hands relaxed and parallel to the ground
Four Mallet Grips:
Steven's Grip (common for DCI or field percussionists):
Steven's Grip (common for DCI or field percussionists):
|
To begin, hold the hand out as if shaking hands, thumb pointed up.
|
Outer mallet:
|
Inner mallet:
|
Full grip:
|
Helpful Hints:
Use a forearm motion like turning a doorknob. Try to use more of a wrist motion versus a forearm motion in order to increase accuracy and speed.
|
Outside mallet rotation (thumb coming parallel to ground while head of mallet rising)
|
Inside mallet rotation (thumb returning to "French" grip position while outer mallet strikes the bar)
|
Burton's Grip (common with concert percussionists, this is the grip I was taught):
This grip is called a "cross grip" since the two shafts of the mallets cross each other.
This grip is called a "cross grip" since the two shafts of the mallets cross each other.
|
Hold the inside mallet using matched grip
|
Palm facing down, slide the outside mallet between the index and middle finger and between the inside mallet and palm of the hand
|
Lay the middle finger across the intersection of the two mallets for support
|
The hands should be flat with the thumbs facing the side
|
Stance
|
Stand in the octave that you usually play with your feet shoulder width apart
|
When you need to move around the keyboard, shift your weight to the left or right as needed. For larger intervals, side step as needed in the correct direction
|
Avoid crossing feet to reach for notes or cross sticks. Also stand far enough away from the keyboard to make sure the mallet heads can strike the center of the natural bars or edge of the accidentals
|
Playing Areas
|
Center of the bar
|
Edge of the bar
|
DO NOT STRIKE THE NODES
|
For bells and vibraphone always strike the center of the bar as the bars are not graduated.